
EYR Budget Friendly Series: Cheap Science Activities for Kids
Posted by EYR Team on 17th Feb 2025
read more
School budgets are tight, fact. This budget-friendly blog series will explore cost-effective solutions to teaching and share subject-specific activity ideas. This is to provide educators with simple activities that will engage children in curricular subjects without breaking the bank. We kick this series off with “how to teach science on a budget.” This way, you can begin to prepare your lessons in advance of the upcoming British Science week. In this blog we will share 5 ways to teach science on a budget as well as activity ideas. This should provide you with plenty of options to choose from to suit your setting and your children.
5 ways to teach science on a budget
1. Get outside
The great outdoors is the biggest science lab you can get! Below are some inexpensive outdoor activities to try:
- Why not try a simple scavenger hunt? This offers children a great opportunity to explore the natural world and hunt for various plants, animals or minibeast. Doing this at various times of the year means that children can compare differences in the different seasons.
- Grow a plant from fruit or vegetable seeds. Again a simple and inexpensive idea. Encourage children to save seeds from the fruit and veg they eat. For example, the pepper seeds or apple pips, and plant them outdoors in a patch of earth. Children can monitor the progress of their plants and observe the changes.
- Make a sundial! This could be done with resources such as paper plates or simply a bit of chalk, blu tac and a pencil. Draw your clock face with chalk (if using) on the ground with the 12 at the north point. Add your blu tac to the centre and stick a pencil in. When the sun shines it will cast a shadow on your clock face which will allow children to explore time!


2. Use everyday household items
Who says that science needs to use specialist equipment? There are plenty of experiments that can be done using household items such as vinegar, baking soda, food colouring and even paper towels. Here are some of our favourites:
- Walking water: for this experiment, you will simply need a few cups of water, food colouring and paper towels! Start by adding some water and a couple of drops of food colouring to each cup. Then add your paper towels so that each towel has each end in a cup. Sit back and watch as the coloured water moves up the towel and into the next cup and creates a “walking rainbow”.
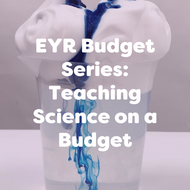
- Foam raincloud: again for this experiment, you only need a few resources, a cup, water, food colouring and shaving foam. Fill your cup or beaker with water and add a generous helping of shaving foam onto the top. This will be your “cloud”. Next, add a couple of drops of blue food colouring onto the top and watch as this travels down through the “cloud” into the water to imitate “rain”.
- Baking soda volcano: whilst this experiment looks like a lot of work it is super simple and uses next to no resources. We chose to create a volcano using clay around an old water bottle but you could skip this part. Add some red food dye, washing-up liquid and baking soda into your bottle and give it a little mix. Then add white wine vinegar and watch as the volcano erupts!


3. Make use of free resources!
There are so many amazing free downloadable resources that can be used to explore science. The British science association responsible for hosting British Science week have some fantastic downloadable worksheets and you can find plenty of free science resources on our website!
- Hand X Ray: our free Human Hand Download is a great way for children to learn more about their bodies. Why not colour the hand in and hold it up against a light source like a light table to create an X Ray?
- Rocket template: colour in your rockets from the template and using a standard biro pen, add a dot of ink to the bottom of the rocket. Next, fill your tuff tray with water and place your rockets in and watch them go!
- Blooming Flowers: cut out our flowers from the template and colour them in. Then fold in each of the petals over the centre and pop them in a plate of water, watch as the flowers open up and reveal themselves!


4. Reach out to local organisations
Lots of organisations such as museums, galleries and nature centres offer educational programmes that are great for teachers. You will likely find that most organisations will be more than happy to talk about their organisation and try to encourage the next generation to take an interest in science. Many places are more than happy to come into your setting and teach a scheme for a few weeks or even send over resources for you to use!
One such option that is local to our headquarters in Manchester is the Museum of Science and Industry! With free admission, the museum is a great place to take children for them to explore different areas of science. As well as the museum itself, they also offer online talks which make science even more accessible within the 4 walls of your classroom!

5. Get creative!
Why not try and think outside the box and come up with your own science activities using resources that you have to hand? Experiments do not need to be rigid, just remember that encouraging children to investigate and ask questions is the foundation of scientific discovery. We have added a few suggestions to try below:
- Spaghetti and marshmallows towers: why not give your little ones a problem-solving activity? Provide them with spaghetti and marshmallows and give them the task of building the tallest tower using just this. Children will be required to think logically and analyse their outcomes to find a solution to this STEAM activity.
- Float or sink exploration: why not try exploring materials and their properties by testing what objects float and which sink? Children can hunt for their own items and record the outcomes using our downloadable worksheet!
- Leak proof bag experiment. For this, you will simply need a plastic bag (ideally a zip lock one), water and some skewers or sharp pencils. Fill the bag with water and seal it shut. Ask each child to stick a sharp skewer through the bag and out the other side. Watch in amazement as the bag doesn’t leak and then slowly pull the skewers or pencils out and watch the outcome!


Final thoughts
Hopefully, we have demonstrated to you in this blog that teaching science on a budget does not mean that children miss out in any way. The key is to be resourceful and think creatively – remember that as long as children are curious and can explore new concepts, they are always learning!
We would love to hear about other budget friendly science activities that you have tried in your setting, share your experience with us on social media by tagging us or using the hashtag #ExploreWithEYR